

The Main Interface
Harmonybeam’s interface is divided into three horizontal sections stacked vertically within the device.
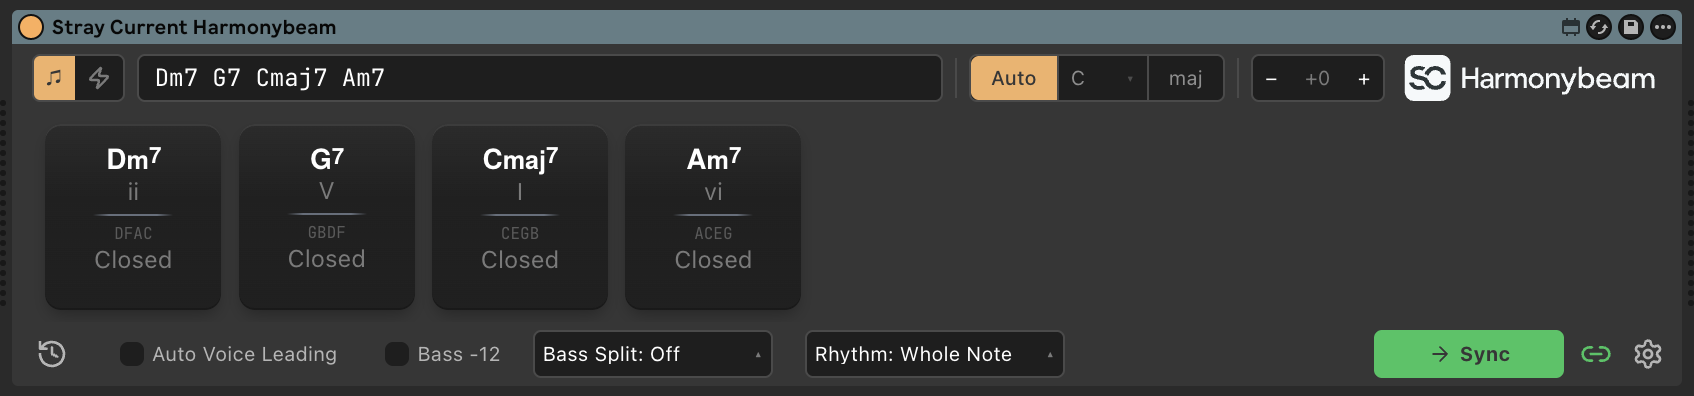
Top Bar
Section titled “Top Bar”Input Bar
Section titled “Input Bar”The Input Bar and its Mode Toggle allow entering either chord notation or generating fresh local progressions from genre-specific rules:
- Notation mode (♫) — type chord symbols directly, e.g.
Dm7 | G7 | Cmaj7 - Generation Mode (⚡) — choose genre, length, and temperature, then click Generate
See Input Bar & Progression Generator for full details.
Auto Key toggle and Key dropdown
Section titled “Auto Key toggle and Key dropdown”When activated, the Auto toggle automatically reanalyzes the key when the progression changes. In this mode, manual key selection is disabled. When the toggle is deactivated, you can choose the desired key from the Key dropdown. Note that this does not transpose existing chords to the new key automatically; it merely updates the Roman notation to reflect the new relationships to the key.
Transpose controls
Section titled “Transpose controls”To actually transpose, use the transpose controls. The key will follow automatically, but can be changed afterwards, as per above. This way, both key and actual transposition can be controlled independently.
Main chord strip
Section titled “Main chord strip”The middle section displays your chord progression as a horizontal strip of chord blocks. To add new chords, click the + that appears after the last chord in a progression or between chords. To add a pause instead, use the adjacent rest button; rests occupy time in the progression independently of the selected rhythm pattern.
Each block shows:
- The chord symbol (e.g. Cmaj7)
- The roman notation relative to the current key (e.g. I)
- Note names, intervals, or gesture values (configurable in Settings via the Chord Block Subsection setting)
- The voicing style
Rest blocks show a rest label instead of chord information. They can be moved and resized like chord blocks, and clicking a rest turns it back into an editable chord block.
On each block, you can:
- Click on the chord symbol to open the Chord Picker to replace it
- Click on the lower grab handle to move chords and reorder them
- Drag the right edge of a chord block to resize its length
- Click on the X symbol to delete a chord
- Hover over the delete area and use the rest button to turn a chord into a rest block
- Click the lock icon in the top-left corner to cycle between Unlocked, Shape Lock, and Full Lock
- Click on the name of the voicing style (e.g. “Closed”) to open the Voicing Picker
- Click on the arrows on the left side of the voicing style to cycle through manual inversions
Clicking on any area on a chord block that is not one of the above elements will trigger its MIDI preview.
Shape Lock and Full Lock are explained in detail in Adding and Editing Chords.
Working with multiple chords
Section titled “Working with multiple chords”You can also click and drag to select multiple chords. When multiple chords are selected, the following operations will affect all selected chords:
- Clicking and dragging any one selected chord will move all selected chords
- Clicking on the X of any one selected chord will delete all selected chords
- Changing the length of any one selected chord will change the length of all selected chords
- Changing the voicing style of any one selected chord will change it for all selected chords
The chord strip also supports the standard editing shortcuts: Cmd/Ctrl+A selects all blocks, Cmd/Ctrl+C copies, Cmd/Ctrl+V pastes, Cmd/Ctrl+X cuts, Cmd/Ctrl+D duplicates, and Backspace deletes the selected blocks.
See Adding and Editing Chords for full details.
Triggering chord blocks and controlling the Chord Picker with MIDI
Section titled “Triggering chord blocks and controlling the Chord Picker with MIDI”You can trigger the MIDI preview of chord blocks and even cycle through chords and voicings with MIDI input. By default, the white keys of octave C6 map to the chord blocks, e.g. C6 maps to the first block, D7 to the second and so on. The mapping is configurable in the plugin settings. See MIDI Configuration and Controls for more details.
Bottom Bar
Section titled “Bottom Bar”Progression Log ()
Section titled “Progression Log ()”Opens a history of recent chord progression text snapshots. Use it to quickly return to an earlier progression without stepping through Ableton’s global undo stack.
The log stores up to 50 non-empty progression entries. Entries are created from Input Bar edits, chord block edits, and Progression Generator results. Undo and Redo actions do not create new log entries, which keeps the menu from filling with back-and-forth restore states.
Auto Voice Leading
Section titled “Auto Voice Leading”Toggles automatic voice leading to allow for smoother chord transitions. See Automatic Voice Leading for details.
Bass −12
Section titled “Bass −12”Drops the bass in all chords by one octave.
Bass Split
Section titled “Bass Split”Routes bass notes to a separate MIDI track. See MIDI Clip Sync - Bass Split for details.
Rhythm dropdown
Section titled “Rhythm dropdown”Select a rhythm pattern among the factory presets to apply to the whole progression, or choose Create new… to build your own in the Pattern Editor. Every pattern — factory or user — can be edited and saved. See Pattern Editor for full details.
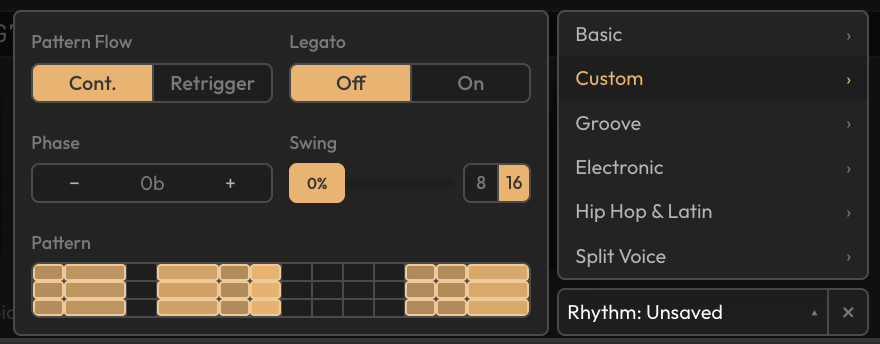
The expanded rhythm panel also includes Pattern Flow, Legato, Phase, and Swing controls. Pattern Flow chooses whether the pattern restarts on every block or keeps flowing continuously through the progression. Legato ties identical notes across adjacent blocks where the rhythm allows it. Phase shifts the pattern start in 16th-note steps (0.25 beats), which is useful for quickly creating variations from the same preset. Swing applies a global swing feel to the pattern, with an 8/16 toggle to choose whether eighth or sixteenth notes are swung and a slider for the amount. These rhythm settings also apply to synced MIDI clips.
To turn rhythm off entirely, click the X on the Rhythm dropdown.
Sync button
Section titled “Sync button”Enables MIDI Clip Sync, so that any changes to the progression are instantly reflected on a MIDI clip on the track. See MIDI Clip Sync for details.
Settings button ()
Section titled “Settings button ()”Opens the settings panel. If a new version of the plugin is available, will also show a small mark here to notify.
Pop Out
Section titled “Pop Out”The Pop Out button opens Harmonybeam in an external floating window that can be freely scaled. Extending the window horizontally lengthens the visible strip of chord blocks. Click Return to Dock to close the floating window and return to the docked view.
Related settings
Section titled “Related settings”On the Settings page, the following settings affect startup behavior and how notes and chords are displayed:
Boot Progression
Section titled “Boot Progression”Sets the progression used when a new Harmonybeam device is added. Reopening an existing Live Set restores each device’s saved progression instead of replacing it with the Boot Progression.
Key Spelling
Section titled “Key Spelling”Determines how chromatic (non-diatonic) notes are spelled:
- Circle of Fifths (default) — sharp keys use sharps, flat keys use flats
- Sharps — chromatic notes prefer sharp spellings (C# over Db, F# over Gb)
- Flats — chromatic notes prefer flat spellings (Db over C#, Gb over F#)
Diatonic notes — the seven notes that belong to the current key — keep their correct scale-degree spelling before accidentals are simplified. For example, in C minor, the diatonic Ab, Bb, and Eb will be spelled with flats even when Sharps is selected. The preference mainly affects the chromatic notes outside the scale, where the enharmonic choice is genuinely ambiguous.
This setting also affects the Key Wheel in the Chord Picker: enharmonic key names are displayed according to the preference (e.g. C# vs Db).
Simplify Accidentals
Section titled “Simplify Accidentals”Chooses readability over strict theoretical spelling:
- Double accidentals such as C##, Dbb, F##, or Bbb are shown as simpler enharmonic equivalents such as D, C, G, or A.
- Edge cases like B#, Cb, E#, and Fb are shown as C, B, F, and E.
- When off, theoretically correct but less common spellings are preserved, including diatonic double accidentals in remote keys such as F## as the leading tone of G# major.
With this setting on, Harmonybeam may intentionally show a simpler note name even when strict key spelling would use a different letter. Turn it off when you want fully theoretical spellings for remote keys.
Roman numerals remain functional labels relative to the current key. Spelling preferences and accidental simplification can change displayed note and chord names, but they do not change the harmonic function represented by the Roman label.
Chord Block Subsection
Section titled “Chord Block Subsection”Determines what is shown in the lower section of each chord block:
- Note Names — the individual note names of the voicing
- Intervals — the intervals of each voicing note relative to the root
- Gesture Values — the active gesture values of the chord block (see Chord Gestures)
Chord Label Priority
Section titled “Chord Label Priority”Determines which label takes precedence when a chord block shows both a chord symbol and a Roman numeral. Set to Chord Symbol to emphasize the symbol, or Roman Numeral to emphasize the Roman notation.
Default Velocity
Section titled “Default Velocity”Sets the default velocity for newly created chord blocks, wherever a chord’s velocity has not been explicitly overridden.