

Pattern Editor
The Pattern Editor is Harmonybeam’s built-in rhythm sequencer. It lets you create rhythm presets from scratch, edit existing factory presets, and save the results as your own user presets. Patterns are drawn on a step grid of three lanes, so you can build advanced multi-layered grooves (like the “Split” factory presets) with independent velocity accents per hit.
Opening the Pattern Editor
Section titled “Opening the Pattern Editor”The Pattern Editor lives inside the Rhythm dropdown in the bottom bar. Open the Rhythm dropdown and click the Pattern preview to open the editor:
- When the current rhythm is a factory preset, the preview shows an Edit… action. Editing a factory preset switches the rhythm to an unsaved custom pattern, which you can then save as a user preset.
- When the rhythm is set to Off, the preview offers Create New… instead.
- Use the back arrow in the top-left of the editor to return to the rhythm controls.
The pattern grid
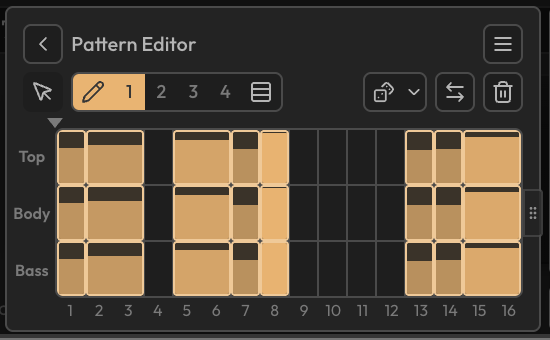
Section titled “The pattern grid”The editor shows a step grid with three lanes, labeled Bass, Body, and Top. Bass represents the lowest note of a chord, Top the highest note, and Body all notes in between them. Each column is a sixteenth-note step, and a pattern can be up to 16 steps long (one bar). Each filled cell is a hit — a chord-part placed at that step in that lane. The three lanes let you place chord parts independently, which is how patterns like the factory “Split” presets create a layered bass-and-upper-voice texture.
A playhead moves across the grid during playback, and a small arrow marks where playback starts (the current Phase). The right edge of the grid is dimmed beyond the current pattern length.
Drawing and editing hits
Section titled “Drawing and editing hits”The editor has two tools:
- Cursor — select and edit hits. Click a hit to select it, drag a marquee to select several, or hold Cmd/Ctrl while clicking to toggle selection. Drag a selected hit to move it in time or to another lane, and drag its left or right edge to resize it. Double-click an empty cell to create a hit, and double-click an existing hit to remove it. Double-click in empty space, hold the second click, and drag to draw a rectangle that creates hits spanning the dragged area — this lets you create a hit of a specific length, or hits across several lanes at once.
- Pencil — draw hits directly. Click and drag across the grid to paint hits; the vertical position of your pointer within a lane sets the hit’s velocity. Painting over an existing hit repaints its velocity instead of creating a new hit. Hold Shift while dragging to erase. When the pencil is active, two extra options appear:
- Pencil step (1–4) — draws a hit only every 1, 2, 3, or 4 cells, useful for quickly laying down spaced hits.
- Link lanes — draws or erases across all three lanes at once.
Velocity
Section titled “Velocity”Every hit has its own velocity, shown by the hit’s fill intensity. To adjust it, select a hit and drag its velocity indicator vertically, or use the Up/Down arrow keys. In the Pencil tool, velocity is set by where you place the pointer vertically within the lane.
Pattern length
Section titled “Pattern length”Drag the handle on the right edge of the grid to resize the pattern from 1 to 16 steps (you can also use the Left/Right arrow keys when the handle is focused). Shortening the pattern trims hits that extend beyond the new length; lengthening it reveals the additional dimmed steps for you to fill.
Randomizing
Section titled “Randomizing”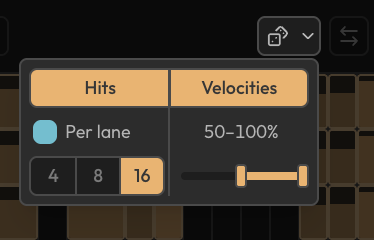
The randomizer button generates new pattern variations. Its label shows the active operation: Hit, Vel, or Hit+Vel.
- Hits — randomizes hit placement, while Per lane controls whether all 3 lanes should be kept in sync or randomized differently.
- Velocities — randomizes hit velocities within a min–max range.
- Resolution (4/8/16) — the step grid used for the randomized hits.
These randomizer options are saved as user preferences, so they remain selected when you close and reopen the Pattern Editor.
Reverse and Clear
Section titled “Reverse and Clear”- Reverse — mirrors the pattern in time, so it plays backwards.
- Clear — removes all hits, leaving an empty pattern.
Saving, renaming, and deleting presets
Section titled “Saving, renaming, and deleting presets”The preset menu (top-right of the editor) manages user presets:
- Save — saves the current pattern as a user preset (or updates the preset it was loaded from).
- Save As — saves the current pattern under a new name.
- Rename and Delete — manage existing user presets.
Factory presets are read-only. To use one as a starting point, edit it (which switches it to an unsaved custom pattern) and then save it as a user preset. User presets appear in their own Custom group in the Rhythm dropdown, alongside the factory categories (Basic, Groove, Electronic, Hip Hop & Latin, and Split Voice).
Keyboard shortcuts
Section titled “Keyboard shortcuts”While the Pattern Editor is focused, the standard editing shortcuts apply: Cmd/Ctrl+A selects all hits, Cmd/Ctrl+C copies, Cmd/Ctrl+X cuts, Cmd/Ctrl+V pastes, Cmd/Ctrl+D duplicates, and Delete/Backspace removes the selected hits. After copying, move the pointer over the grid and click to place the copied hits.
Rhythm settings
Section titled “Rhythm settings”The Pattern Editor works together with the rhythm controls in the bottom bar. See The Main Interface for Pattern Flow, Legato, Phase, and Swing.
Disabling rhythm
Section titled “Disabling rhythm”To turn rhythm off entirely, click the X on the Rhythm dropdown. (Earlier versions used a “Hold” preset for this; that preset has been removed in favor of the clearer Off state.)